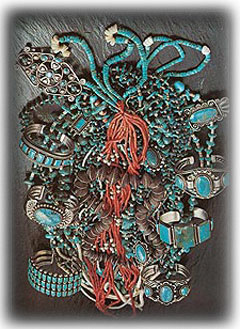
Turquoise Bead Info
Making Beads
Making Beads is an ancient art form which dates back to the beginning of modern man, well over 7,000 years ago. Bead making began when native peoples of the world ground colorful stones on hard rocks to create a round bead for a ritual or self adornment. Beaded making tools probably started around 3,000 B.C. and actually became fairly sophisticated by 1,000 A.D. Bead Making was very strong in the days of Columbus as Trade Ships would use all types of glass beads as ballasts in the ships. Making beads has been an important trade for hundreds of years.
Native Peoples around the world began to make their form of beads and bead making was standard in most parts of the world by early man. As the world trade and the advent of the Trade Ship came to be, beads were one of the first items to be taken around the world to be traded as they were heavy by volume and easy to load in the hulls of the ships for ballasts. Bead making was very important as they became in demand by native peoples worldwide and they were traded for Gold. Some Trade Beads were actually worth more than three times there weight in gold at one time in history. At that point, you can imagine how important bead making was and Making beads was a trade for many people. Read more about Making Beads
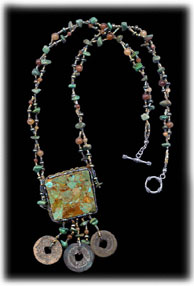
Turquoise Beads
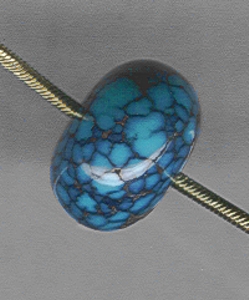
Turquoise Beads and the Turquoise Bead was one of the first Gemstone Beads to man. Recorded history (Cairo Museum, Egypt) show that Turquoise Beads were being made prior to 5,500 B.C. and a Turquoise Bead has been found that is expected to be much earlier than that. Turquoise Bead Making started early as Kings, Pharos, Healers and Spiritual Leaders believed Turquoise was sent from the fathers above and had metaphysical powers. The Turquoise Bead and making of Turquoise beads plays an important role in the history of the world! Early Turquoise Beads came from Egypt, then Persia, China, Tibet and North America.
The Native American Indians of North America are believed to have been making beads as early as 800 A.D. and maybe much earlier. Bead making by the Santo Domingo was in full swing in the seventeen hundreds and were traded in Santa Fe and on the Santa Fe Trail. Today Turquoise Beads are made worldwide and in high demand by the Jewelry and Fashion Market. Fashion Turquoise Jewelry is made with Turquoise Beads and major trade in Turquoise Beads is stronger then at any point in history. Read more about Turquoise bead History
For more interesting information on Beads see:
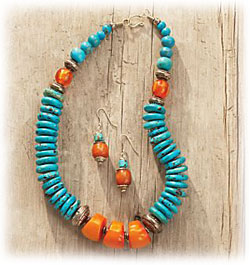
Turquoise Beaded Jewelry | Turquoise Bead Earrings | Bead Necklace Turquoise | Turquoise Bead Bracelet
Fashion Turquoise Jewelry | Fashion Bead Jewelry and Fashion Beads | Turquoise Bead Pendant
To buy Turquoise Bead Jewelry
The Bead Making Process
Below is a description of how making beads is done in brief. This is an example of how Turquoise Beads are made one Turquoise Bead at a time. Beaded making of necklaces and other types of Jewelry is done from the bead strands that are made as a measurement of quantity from the bead making manufactures and individuals.
Cutting Handmade Beads Much Like a Turquoise Bead
Preparing the Rough Stone for Cutting
Choose your stones then figure out:
If you have a piece of stone large enough to just slice it up into various size squares, this is all you need to do.
If you are using small pieces of rough stone, which you can only get one, two or three beads out of, then this process is a lot more involved.
On a flat lap, face the rough on the side that will produce the largest bead blank. Knowing that in the final shaping process you will lose some material from the side of the bead.
After grinding the rough to thickness, then saw or grind a flat face to do your layout from. Working from this face, with the use of a dial caliper and a carpenter square, lay out lines on the stone to show the largest square that you can get. With the use of a 4" trim saw, cut along the lines you laid out. After sawing the blank from the rough, if you have not ground the second side of the bead blank, then grind it flat and parallel to its opposite side.
Drilling The Bead
Some bead makers drill their bead blanks by visually drilling at or near the center of the blank. We think it is best if you measure and mark the center of each bead blank prior to drilling. In doing this you will nearly always get the maximum size finished bead from your blank. If you are using material that costs up to $200.00 dollars a gram this is a must as far as we are concerned.
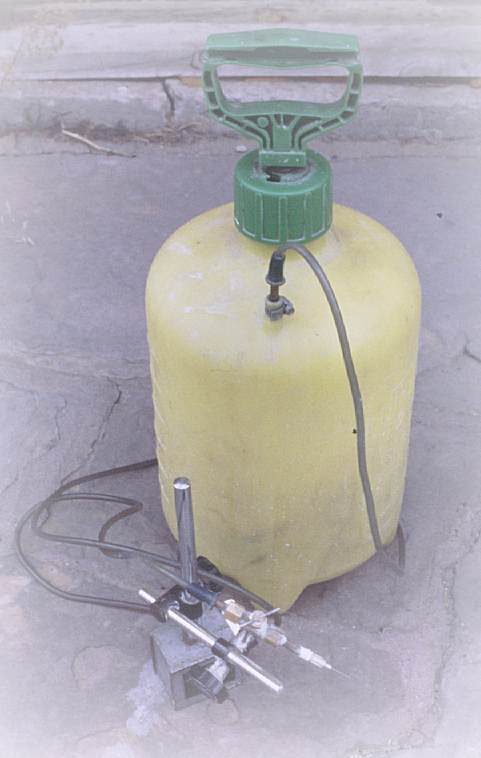
For drilling, you can use the "Daniel Lopacki" set up as he describes on his website (www.lopacki.com), which is a diamond drills in conjunction with a Foredom with a #30 handpiece a Foredom drill press and a table top variable speed control. He uses a brass water tray that screws to the drill press table with a thumb screw from below, and in the bottom of this tray he has adhered with dop wax a piece of a hard stone slab. The reason for the hard stone in the bottom is two fold: It gives you something very flat to place the bead blank on and it reduces blow out to a minimum. Blow out results from the pressure of the drill point breaking a circular portion from the bottom of the blank just before it drills through.

You can drill your blanks with them submerged in water, but you will need to change the water in the tray quite often so you can see the layout lines.
You can avoid this problem by making a pressurized water system from an ordinary garden sprayer, a valve that I purchased at the hardware store, and a small hypodermic needle.
With this system you can direct the flow of the water precisely where you want it to go. With a drain hole in the tray, you will always have clear water to see the layout lines on the bead blank.
If needed, to achieve a standard size hole you should drill your first hole undersize. Then come back and drill it with the desired sized hole drill. This results in a hole that is the same size in every bead blank.
If you want a large sized hole start with 1 mm and then step up to finish size i.e. 1mm / 1.25mm / 1.5mm / finish at 2mm. The logic for doing this, it is much easier and quicker for the 1mm drill face to penetrate than the 2 mm. Once you have the initial 1mm hole all other holes go very quick, usually a matter of a few seconds. Not to mention you have less of a chance of a stone blowout on the back side.
The recommended speed of the drill is about 3,000 to 4,000 RPM for the .75 mm diamond drill. As the diameter of the drill increases, the speed should come down accordingly 2.5 mm about 1500 RPM. Excessive speed keeps the water from reaching the bottom of the hole.
Diamonds create ultra fine dust as they drill, so it is a must that you clear the drill quite often -- drill down a little bit and then raise the drill out of the hole, repeating this process until you are through the bead blank.
Please note: The deeper you drill the less time you can keep the tip at the bottom of the hole as it is very hard for the dust to work up out of the hole.
Remember, too high of speed or not keeping the hole washed out will result in the diamond plating burning off the drill shaft.
ROUNDING
Daniel Lopacki has developed a fixture for rounding the blanks one at a time. In using this fixture you lose some time in the process of rounding each blank, but your end result on any given bead is the largest bead possible from that blank, again if you are using expensive
He found that you can achieve near-perfect rounds for a whole strand in as little as an hour using this fixture. Even if it takes two or three hours to get your near-perfect rounds, the time it saves in the next step of the process more than makes up for the time spent in rounding.
The fixture is very simple to make: all it requires is a pin vise, a piece of metal bent at a ninety-degree angle with a slotted hole on one side.
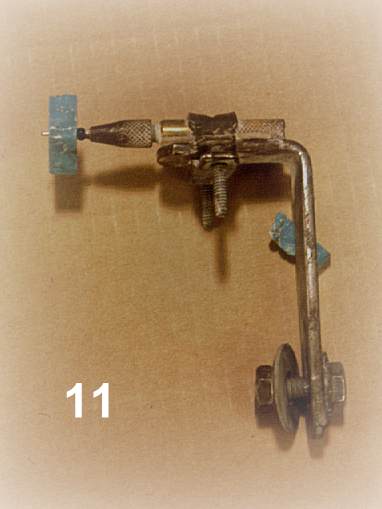
The reason for the slotted hole is so you can adjust the height of the pin vise so that its center sits just below the center of the grinding wheel.
You will need to secure the pin vise to the slotted metal piece. Daniel's choice is the screw clamp that is commonly used to secure electrical wires going into a knockout box.
Once your fixture is made you will need to drill and thread a hole in the side of your splash pan for mounting the fixture to your machine. Bolt the fixture to your machine tight enough to allow it to move backward and forward, but not loose enough to allow the grinding process to push the blank away from the wheel.
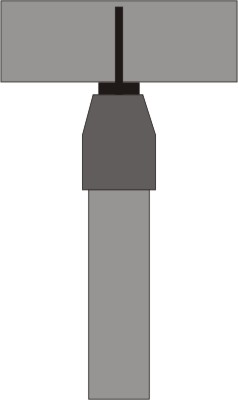
Pull the fixture away from the wheel, place a bead blank onto the pin in the pin vise (the pin should be slightly smaller than the hole size), slowly push the fixture forward until the blank touches the wheel, then slowly turn the blank around with your fingers. The result will be an almost perfect tube that is ready for the next step in the process.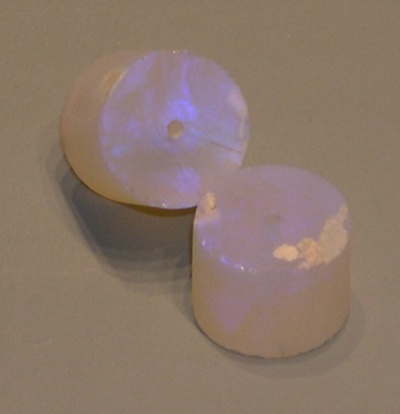
SHAPING
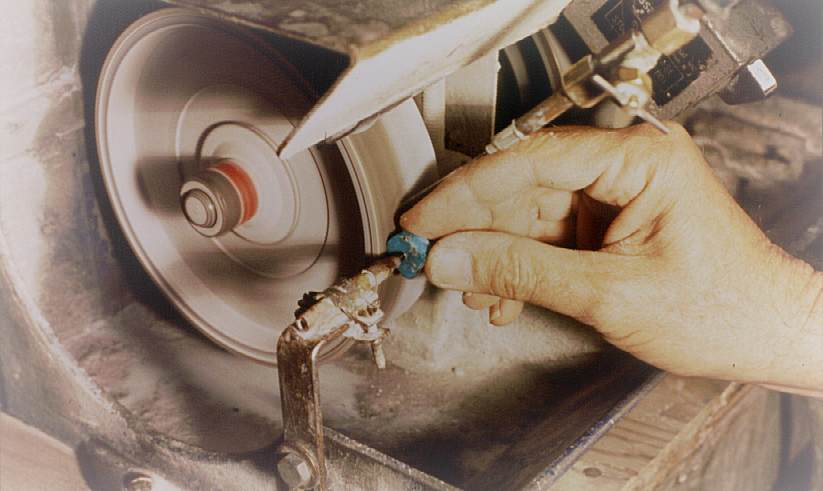
Shaping is the process that literally makes or breaks the beads that you are making. If you are trying to achieve a smooth symmetrical bead, you need to shape each half of the bead exactly the same. In order to do this consistently, it takes practice, practice and more practice!
You will eventually get to the point where you will be able to shape a bead with only one hand and with excellent results.
First you want to choose a pin for the pin vise that is just slightly smaller than the hole in your bead and just loose enough for the bead to spin freely. You will need to keep a moist bar of soap on hand, as this is used to lubricate the bead on the pin.
You will use a soft stone "spinner bead", below any bead you are working on. This spinner bead keeps the pin vise from cutting a groove into your bead as it spins.
It is preferable to work with bead blanks starting with the thickest and working down to the thinnest. The reason for doing this is that you want the tip of the pin to be just below the top of the bead face. If you start with the thick beads and work your way down, you just have to lower the pin in the vise from time to time.
Place your spinner bead on the pin, rub the pin on the moist soap bar and place your bead blank on the pin. Then loosen the pin vise just enough to allow you to push the pin just below the surface of the blank. This done, tighten the pin vise.
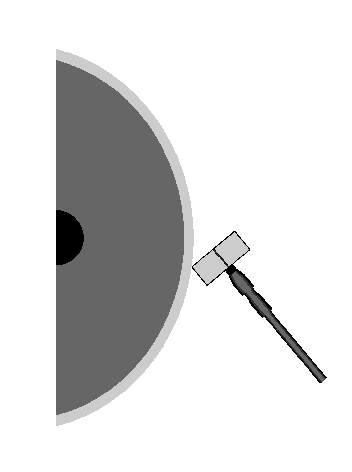
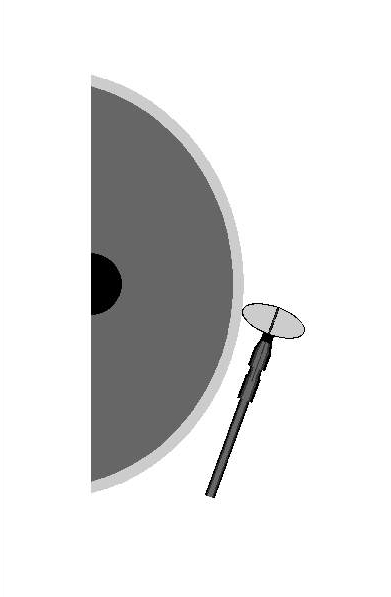
Start the shaping process by holding the pin vise as near vertical as possible to the grinding wheel and lightly touching the edge of the blank just below the center of the wheel, the blank will start spinning. Break the edge a little and then tilt the blank inward toward the hole, as you do this apply a small amount of pressure against the wheel. This will start the grinding process and also keep the bead spinning. Make it a point to shape beads right down to the hole, as this allows you to grind off any blow out that resulted from the drilling process.
Working from the hole out, you can start to grind the material from the blank. Watching the side of the blank works best for because you can see the bead as it is shaped. Rough out the shape on one-half, and then the other, to remove the excess material. To assure that the bead is balanced go back over the bead to achieve the final shape.
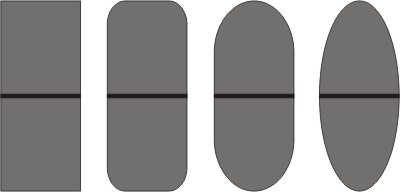
Three bead shapes from same blank.
Remember to use the soap every time you put a blank on or turn a blank over!
SANDING
Sanding your shaped bead is exactly the same as the shaping process, except that at this point you are only smoothing out any rough spots on the shaped bead, not removing excess material. If the bead seems to have an irregular shape that you do not like, it is best to go back to the grinding wheel to reshape it; trying to do this on the sanding drum is a very slow process.
Use a worn 600 grit sanding drum for sanding. This will remove any scratches from the grinding process and leave no new coarse scratches on the surface of the bead. It is suggest that you use either a five or ten power eye loupe to inspect each bead for scratches prior to polishing, as you cannot remove a grinding scratch in the polishing process.
The sanding steps follow: rub the pin on the soap, place your small jet spinner bead on the pin, place the shaped bead on the pin and make sure that the pin is just below the surface of the hole in the bead. Using the same technique that you used in shaping, start sanding the bead from the hole out. As you come around to the face of the bead, make it a point to sand past the center of the bead face.
This takes some practice so don't be surprised if your bead jumps off the pin when you first try this technique. Turn the bead over and repeat this process. When you feel that the bead is finished, check it with the loupe for scratches. If no scratches are visible, the bead is ready for polishing.
POLISHING
You can use any of three hand techniques to polish beads. The one you use depends on how hard the material is and how much of a water wet look you want on the bead. These techniques work best if you have sanded all of the scratches off of the beads and have used a worn sanding drum. If so your bead should look almost polished.
For softer material such as Turquoise or stone of similar hardness, we have found that you can use Zam, a commercial green buffing compound, to achieve a brilliant polish. Apply the Zam to a treated muslin buffing wheel and use exactly the same techniques that you have used in the sanding process. One point to remember is that you don't use the soap for a lubricant in this process; you can only use soap when water is present. In this and all other processes you need to remember to use the jet spinner bead.
For harder material such as Lapis, Sugilite and similar material, you can use diamond powder mixed with honing oil, or the diamond paste that comes in a syringe. As long as there are no scratches on the beads, you should be able to go right to a 14,000 mesh compound. If you are using the syringe with the paste, apply directly from the syringe. If you want to mix your own diamond compound you will need to purchase diamond powder and honing oil. Crystalite sells an oil called diamond extender which works well for this purpose. In a small bottle (the five carat diamond bottle works great), mix approximately two carats diamond powder with ten to fifteen drops oil. Each time you apply this mixture, shake the bottle vigorously to suspend the diamond in the oil.
Using a hard felt 4" buffing wheel, apply the diamond compound to the buff with your finger tip. Rub the paste or the homemade mixture over the entire face of the felt wheel. When you first start to use the felt wheel, you will need to apply the compound quite often, but after awhile you will find that you need only apply the compound infrequently. Again use the same technique that you used in sanding, to polish the bead. A note of caution -- the felt buff will cause a heat buildup in the bead, so do not use this technique to polish heat sensitive material such as Opal.
The third process is for very hard material such as petrified wood, agate, tourmaline, and ruby. This process is somewhat involved and we don't recommend that it be used, unless you are using very unusual or very expensive material. It is recommended to use this process on Opal as it will make the Opal beads look like they are wet.
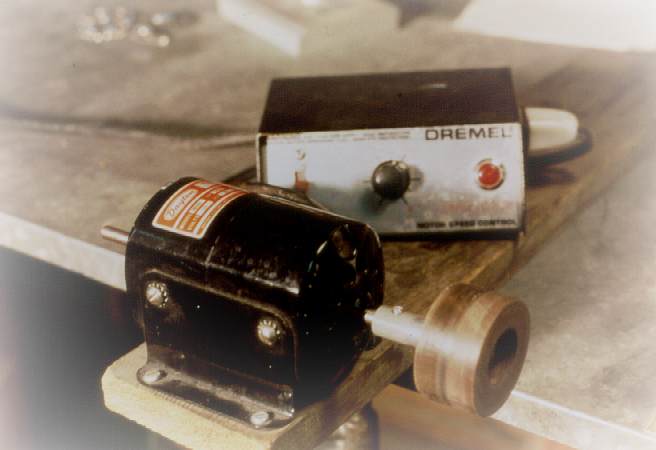
You will need to purchase a few special things for this process -- a small motor, Foredom Bench Lathe which can be used in many more applications other than polishing.
The wheels that you will be using are of redwood or a similar softer wood, and most likely you will need to have them made at your local wood working shop. The wheels that I use are two inches in diameter and roughly one inch wide. The diameter of the wheel can vary but I think anything over four inches is unnecessary. You will need three wheels on three separate mandrels.
After you have your setup put together, you will need to charge one wheel with 1,200 mesh, one with 14,000 mesh and one with 50,000 mesh diamond. Apply the diamond oil mixture in the same way as with the hard felt wheel. I use the diamond oil mixture only on wood: Diamond has an affinity to oil and as the oil/diamond penetrates the wood it has a cutting plus lubricating effect with no heat buildup.
PLEASE NOTE: It is very important that you store your polishing wheels in their own zip lock bags, mark each bag and wheel with the mesh size. If you neglect to do this you will contaminate the wheels and they will always drop scratches on your surface being polished.
You will need to do the following steps with all three of the diamond grits, first 1,200 then 14,000 and finally 50,000. It is imperative that you clean all of the compound from each bead before going to the next step, otherwise you will contaminate the wheel of your next step with the coarser grit and this will cause scratches that you won't be able to overcome. You must also make sure that the holes are thoroughly clean. I do this by drawing a bead cord with the wire needle that is slightly oversize, through the beads in warm soapy water.
On the 1200 mesh wheel use the same technique that you used in the sanding process. Using the variable speed control, set the speed of the wheel at the speed which seems to work best for the mesh size you are using. You do not need high speed, you want the diamond to have a chance to cut. Repeat this process for each mesh size. You will notice a distinct difference in the bead as you go from 1,200 to 14,000 to 50,000. If you choose to polish your beads in this way you will be amazed at the end results, and you will have a strand of beads that will show off your material to its best.
Thank you Daniel Lopaki.
Turquoise Bead History:
Native American Turquoise Bead Making History
|
Pre-historic Indians of North America mined Turquoise over a thousand years ago. They used the Turquoise for spiritual ceremonies, metaphysical purposes and self adornment. The Turquoise was ground into shapes with crude stone tools and used as Turquoise Beads for adornment by the natives. Green and Blue Turquoise Beads have been found in ancient graves of pre-historic Indians which tells us the Indians absolutely believed Turquoise has spiritual powers. Substantial Bead making artifacts have been found by archeologists in the Hohokum Indian ruins of Southern Arizona that date back to 200 B.C. and beyond. Other noted areas of Pre-historic Indian mining of Turquoise are at theKingman and Morenci regions of Arizona, the Conejos area of Colorado and the Cerillos & Burro Mountain areas of New Mexico. Making beads, Turquoise Beads being one material of many others, by all of the above Pre-historic Indians of North America was an everyday event as the Turquoise bead was used for many things and had metaphysical powers for the native peoples. |
 |
The Santo Domingo Indians, one most prosperous of the Rio Grande Pueblos, is located near the located near the original Cerrillos Turquoise mines. It was the Santo Domingo people who brought the art of Turquoise bead making to the eye of the Traders, Settlers and the Tourists. The Santo Domingo had been making Turquoise and other types of beads made from stone and shell for hundreds of years, when a trade route was established, (the Santa Fe Trail,) the Santo Domingo Indians were industrious and many made bead Jewelry, took it to the market in Santa Fe and made a good living from their craft.
Today, Turquoise Beads and bead making at the Santo Domingo Pueblo is still a fairly strong industry, however, global trade and bead making has become industrialized in other parts of the world, predominately China, and actual art of grinding the beads has been reduced dramatically. Most of the beads coming from the Santo Domingo Indians are now made elsewhere and just strung by the Santo Domingo Indians for resale.
More information on Santo Domingo Turquoise Bead Jewelry | Buy Turquoise Bead Jewelry
Egyptian Turquoise Bead Jewelry History
Did you know that archaeologists excavated the oldest group of Turquoise Jewelry and Turquoise beads known in the world at the cemetery of the royal tombs at Abydos, in upper Egypt? Gold and blue Turquoise bead jewelry, green Turquoise beads, loose Turquoise beads and Turquoise gold jewelry found are now in the Cairo Museum. Some of these items are claimed to be from 5500 B.C. or earlier.
The Egyptians made many kinds of Turquoise beads such as, barrel beads, heishi, and round beads. Most of these were made with blue Turquoise, but they also used green Turquoise as well. Many of the beads by the Egyptians were mixed with Carnelian, obsidian, glass and Moss agate beads. They wore Turquoise bead earrings, Turquoise bead bracelets and Turquoise bead necklaces, they loved to adorn themselves with Turquoise bead jewelry.
Tibetan Turquoise Bead History
 |
Mined from the Himalayas, Tibetan Turquoise is the most sought after type of Turquoise among the Tibetan and Nepalese people. Turquoise is found on a tremendous amount of of jewelry that has been made in this region for hundreds of years. Turquoise Bead Jewelry worn by the the various ethnic groups that live among the Himalayas, and continues today to be a highly valued item. It is a known fact that most every person in Tibet and Nepal owns at least one piece of Turquoise. Many have vast amounts of Turquoise beads, Turquoise bracelets, Turquoise pendants, Turquoise earrings, Turquoise rings, even Turquoise encrusted headstalls for their horses. Most Tibetans wear Turquoise beads on a daily basis and have had this practice for thousands of years. They use loose turquoise beads as gifts and for ceremonial purposes. |
Chinese Turquoise Beads Past & Present
|
Chinese Turquoise beads have been a part of Asian culture for thousands of years. The Chinese, in contrast to the Tibetans and Americans like their beads to be clear blue or "pure turquoise", so most of the chinese turquoise beads of the past were clear blue turquoise beads. The Chinese have used Turquoise beads for everyday life, ceremony and religious practice for thousands of years and have seen a major re-surgence in popularity as of late. Chinese Turquoise beads of the past were often refined shapes, and especially popular were the round turquoise beads. Today the Chinese Turquoise beads come in just about any shape and color you can imagine. |
 |